
Guide to Authoring Media Ground Truth with ViPER-GT
Introduction
Any system that tries to automate content-based analysis is a method to evaluate performance. Such evaluation is often carried out by comparing candidate data, results obtained from a given algorithm, against target ground truth, a set of results determined a priori to be correct. ViPER-GT is designed to author that ground truth.
This document, which describes use of the ground truth authoring component of the ViPER suite, ViPER-GT, is second in a set of five documents describing the use of the Video Performance Evaluation Resource.
These manuals are as follows:
- Quick Start
- Describes how to install and set up ViPER.
- ViPER-GT
- This document, which describes the ground truth authoring tool and the data formats.
- ViPER-PE
- Describes the performance evaluation tool and its metrics.
- Scripting ViPER
- Describes various scripts to deal with multiple evaluations and make graphs displaying the results.
- Case Studies
- Describes several use cases of ViPER, from design of GTF to evaluation.
ViPER-GT is a metadata markup tool, a viewer of algorithmically generated markup, a tool for assisting performance evaluation of such markup, and more. This document presents the programs, and details both what it does and does not do. ViPER-GT uses an extensible XML based file format, one shared by all of the ViPER tool chain. As such, the file format can describe the video in any way the ground truth author sees fit. ViPER-GT provides a segment-based view of the video, where descriptions of parts of the scene are recorded for arbitrary sets of consecutive frames.1
As such, it is often helpful to think of the three classes of users who depend upon ViPER and its data. There are the evaluators and the algorithm designers, who are the real audience of the ground truth author; they depend both upon the veracity and the utility of the ground truth. Second are the descriptor designers; often program heads or committees, the schema designer must determine both what data is to be marked up and how to describe it. Finally, there is the author of the ground truth herself or himself; she or he must use the tool to mark up the video while following the designers' guidelines. While any one person may take on all roles, it is useful to think of them separately for the purposes of this document. The first few sections are devoted to the use of the tool and are of interest to the third group, while the latter sections are dedicated to designing descriptor configurations and more useful to the designer and evaluator. The evaluator may also find ViPER-GT's browsing functionality useful to view the result data.
Welcome to ViPER-GT
We hope you enjoy our software. We have been developing it in fits and starts for over five years. Although currently missing a few features, such as undo, we find it to be the only ground truth authoring tool that fits our needs. If you have any comments on this manual or the software, direct your comments to viper@cfar.umd.edu.
What is ViPER-GT?
The Video Performance Evaluation Resource Kit's Ground Truth tool, or ViPER-GT, allows users, ground truth authors, to compose video metadata, mainly for use as ground truth for performance evaluation. This includes information describing the file, such as date of filming and keywords about its content. It also includes concrete features, such as scene breaks and bounding boxes around people. This can be used to support a database of video files, from which the most appropriate ones can be chosen for testing performance of vision and video algorithms, and, of course, as ground truth for evaluation.
The metadata format used throughout ViPER, referred to variously as GTF for truth, or target, data and RDF for result, or candidate, data, is arranged as a list of objects called descriptors. A descriptor is a collection of attributes that describe a single object, event or other thing in the file that is worthy of evaluation. Our current data set includes descriptors for human faces, walking people, lines of text and scene cuts. In addition to these types, all files have a single descriptor that gives metadata about the entire media file, such as frame rate, file name, image size in pixels and an optional comment.
Installation
For information about how to install ViPER-GT, refer to the ViPER Quick Start Guide or to the INSTALL file that is in the ViPER distribution. All that this document refers to is included in ViPER-Light, and that is the recommended package for Windows users or people who do not wish to perform all but the most basic evaluation.
Your First Content Authoring Session
When you first run ViPER-GT using the instructions in the Quick Start Guide, it loads with the default image and an empty set of metadata with no defined descriptors. Currently there is no interface for descriptor configuration editing within ViPER-GT, so you must load another ground truth file to actually use the interface. If they are not already installed within your current file system, download and uncompress the ViPER-Samples available at the ViPER project web site. From the samples/GTF directory, where samples is the directory containing the samples, select the all.gtc file2.
This file includes definition for a variety of descriptor types. Currently visible will be the Content descriptors, as described in the Configuration section; the all.gtc file includes a Transition content descriptor. You may edit the metadata directly through the tabs on the bottom right hand side of the window, through the canvas on the upper left hand side, or through the interpolation controls on the lower left hand side. Since each metadata file describes a media file, you will find a selection of similarly named media file - .gtf file pairs in the DATA and GTF directories, respectively. Feel free to browse through them and play with them to get a feel for the system. You may load other media files through the File menu.
Using ViPER
Starting ViPER
Usually, it is possible to start ViPER-GT with a click, if you have installed ViPER-Light. The command line to start the software takes two optional parameters, the ground truth file and the media file to open at first.3 The viper-gt command from the complete package requires the parameters. Both parameters can be either paths to the file or names of files located in the default directories.4
Input/Output
ViPER-GT takes two kinds of data as input: video data for the author to describe, such as an .mpeg video file or a set of images defined in a .info file, and ground truth files which describe the video.
Opening new video
To open a video, use the dialog window that appears when you select File >> Open Sequence or MPEG menu item.
Opening new ground truth file
To open a metadata file, use the dialog window that appears when you select File >> Load Ground Truth menu item.
Navigating Video
ViPER-GT has several GUI controls for traversing the video and accessing specific frames. These controls are all located beneath the main canvas on the left side of the screen. Some are also located in the range operations panel. Note that with any navigation to a frame, all descriptors that are marked for value propagation will copy their value for all frames between the previous frame and the new one, inclusive.
Selecting a Frame Number
Type the desired frame number into the text field labeled Current Frame and press Enter to make the frame typed in the current frame.
Frame Slider
The frame slider bar represents the entire video. The numbers below stand for frame numbers. Drag the frame slider tab to the desired frame to make that frame the current frame.
Frame Advance
Click on button labeled -> to increment the current frame. Click on button labeled <- to decrement the current frame.
Go to Buttons
Go to buttons are located in the range-operations panel, below the propagation slider. Click on Go to Start Range button to make the current frame equal to the min frame of the range defined by range selector bar (RSB).4 A click on Go to End Range sets the current frame to the max frame of the RSB.
Editing Descriptors
Modifying a Descriptor
Modification of an object's attributes is described in detail in the following sections. However, most attributes may be edited directly in the data panel, which contains content descriptors in the first tab and object descriptors in the tabs to the right/beneath the first tab. To modify file descriptors, click on File >>
Edit File Descriptors menu item. Editing the descriptors is as editing elements in a spreadsheet.
Note that content and object descriptors both contain two columns, labeled P and V. The P checkbox is used for propagation and interpolation, described below. The V checkbox is for validity, indicating that the descriptor appears on or has meaning for the current frame. For example, a Transition content descriptor is only valid for frames that represent a cut or fade, and its V checkbox should be unfilled for all other frames.
Further, note that object descriptors have an OBJECT ID column. This column is not editable, but generated automatically. Also note the visibility ball next to the descriptor type names in the tabs. When this is red, the attributes are hidden and unable to be selected. Clicking the ball toggles between visible (green) and invisible (red). Object descriptor attributes may be either static or dynamic; static attributes have an asterisk after their names in the column headings, and can only take one value for the life of a descriptor, but dynamic attributes can have a different value for each frame the containing object descriptor is valid.
Adding Object Descriptors
To create a new object with all attributes initialized to NULL, press the Add button on the appropriate object descriptor type tab. For example, to create a new FACE (assuming your GTF configuration defines a FACE object descriptor), click the FACE tab and click Add.
Duplicating an Object Descriptor
To copy an object descriptor, select the source by clicking in the appropriate cell of the OBJECT ID column and click the Duplicate button at the bottom of the data panel.
Deleting an Object Descriptor
To delete an object, first click on its cell in the OBJECT ID column, and then click the Delete button.
Attributes
The attributes are dived into two categories: text (string based) and spatial (shapes). Text attributes can only be edited in the data table, while shapes can also be edited in the canvas. Before editing an attribute, make sure that the object whose attribute is being edited is valid for the current frame; that is to say, make sure that the V column checkbox is checked for the descritptor whose attribute you wish to edit.
Text Attributes
Text attribute types include bvalues, dvalues, fvalues, svalues and lvalues. To edit text attributes, except lvalue and bvalue, select the attribute in the data table with a click in its cell. A single click selects the cell for editing and places the cursor at the end of the current text, while a double-click selects a word in the cell and a triple-click selects all the text in the cell. The appropriate value may be typed with the keyboard. Lvalue attributes offer a pull-down list instead of a text box, and can be edited with the mouse alone. Bvalue attributes offer a checkbox; checked indicates that the attribute is true.
Spatial Attributes
Spatial attributes, also known as shapes, are the attributes that can be drawn and manipulated in the canvas. Spatial attribute types include bboxes, oboxes, ellipses, open and closed polygons, points and circles.
Selecting
Non-null shapes may be selected with a click on their cell in the appropriate tab of the data panel, or with the Select mode of the canvas. To select through the data panel, turn to the tab of the descriptor type you want to modify, scroll to the object id you want, and click the cell on its row that is in the attribute type column. This is the only way to select NULL shapes.
Selecting a shape from the canvas is possible once the attribute has been created. It is possible to select any shape that is currently visible on the canvas; note that attributes for valid descriptors that have values still might not be visible, if their visibility ball is red. To select a shape you can see, first turn the Current Mode pull-down menu to the appropriate data type: Rect./Ellipse for oboxes, bboxes and ellipses, Circle for circles, Point for points and Polygon for open and closed polygons. After choosing the shape mode click in the image frame near the shape that you want to select. Viper selects the closest shape of the chosen type to the mouse click position. To select multiple shapes hold down the control key while clicking.
Drawing and Editing
You may create and edit shapes in the canvas and the data panel. To draw or edit shapes in the data panel, select the cell for the attribute and descriptor you wish to edit, and then type an appropriate value for the data type as described below. Procedures for drawing shapes using image frame are unique for each shape; these are described for each shape below, as well.
Bbox
Bbox is the non-oriented rectangle shape. It can only be positioned with sides parallel to the axis of canvas. The string representation of bbox is (x, y) h, w where x and y are coordinates of the top-left corner of the box, h is height and w is width. Remember that coordinates of the image count down and to the right from the top left corner.
To draw (create) a bbox using image frame, select the cell belonging to the attribute in the data panel. If the attribute has not been initialized and the value in the cell at this time is null, Viper goes into draw mode.
Click on the place where you want the top-left corner of the rectangle to be in the image frame. Click in the place where you want top-right corner to be. Click where you want bottom-right corner to be. Note that this is different from how most graphical programs work; click-and-hold does nothing in draw mode.
To edit a non-null bbox attribute first select it as described in the above section describing attribute selection. The canvas supports resizing, movement and deletion of bbox attributes.
To resize the bbox, make sure that the resize button is pressed (this is the default state into which Viper after a shape is selected). The resize button shows a an arrow between two sized boxes, and is darker when selected. Click on a side of the selected bbox that you wish to move. Move the mouse to the new position for the side. If the side does not move with the mouse cursor, it was not selected by your first click. Click again to relocate the side.
To move the selected bbox, chose the move button; the move button shows a box moving from one place to another with a small arrow. Then click and drag anywhere in the image frame. The bbox moves together with the mouse. Click again to paste the bbox down.
To delete the selected bbox, click the delete button. The delete button is the one with the large X over a box.
obox
Obox is the oriented rectangle. It offers the features of the bbox, with the addition of a fifth number, the orientation. The string representation of obox is (x, y) h, w, o where x and y are coordinates of the top-left corner of the box, h is height, w is width and o is orientation (angle) in degrees counter-clockwise.
Resizing, moving and deleting procedures for obox are same as for bbox. In addition, a selected obox can also be rotated around the top-left corner and around the center. Each of these edits is supported with an action button with a dot for the center of rotation and a curved arrow representing rotation. To rotate, press the appropriate action button, and then click-and-drag in the canvas. The currently selected obox rotates in response to the mouse motion.
ellipse
The ellipse shape acts exactly like obox. Its string representation is the same as the string representation of an obox that bounds the ellipse. When ellipse is selected, the obox bounding it appears. Perform all actions on the bounded ellipse as you would on an obox.
point
A point's string representation is (x, y) where x and y are the coordinates of the point. A selected point can be either moved or deleted. To move the selected point, drag the mouse in the canvas. To delete a point, hit the delete button.
circle
A circle is defined by its center and radius. The string representation is (x, y) r, where x and y are the center point's coordinates, and r is the radius.
To move the selected circle click on the move button and drag the mouse in the canvas. To resize the selected circle click on the edit/resize button, then click on the side of the circle. If you clicked close enough the circle changes its radius in response to mouse motion. Click again to set the new radius. To delete the selected circle, click on the delete button.
polygon
A polygon is an ordered list of points, with line segments connecting them. Closed polygons have a line segment connecting the first and last point, while open polygons do not. The string representation for both is: (x1 y1)(x2 y2) … (xn yn) where x1, y1, x2, y2, …, xn, yn are the coordinates of points of the polygon. Note that open polygons must have at least two points and closed polygons must have at least three.
The two polygons are drawn in a slightly different manner. To draw an open polygon, select a null polygon attribute in the table. Click in the image frame where you want the first vertex to be. Each additional click creates a new vertex. Continue clicking until polygon is complete. To finalize drawing, click close enough to the penultimate vertex created for a circle to appear around the mouse cursor. Drawing closed polygon is much the same; however, the finalizing click comes not from the penultimate vertex but from the first vertex; to close the polygon, more the mouse close enough to the first vertex for a circle around the cursor to appear, then click.
A selected polygon can be moved, edited or deleted. To move the selected polygon, click on the move button then click and drag in the canvas; the selected polygon will move in response to mouse motion, and a second click will paste it down. To edit the polygon points, press the edit button, which has the same icon as resize for boxes and circles. Then click on the vertex you want to move. If you clicked close enough, the vertex moves with the mouse cursor; otherwise, you did not select the vertex. Move the mouse cursor to the new location for the vertex and click again to paste the vertex down. To delete the selected polygon click the delete button.
Propagation and Interpolation
Overview
ViPER-GT allows users to perform two operations on values of attributes of selected object descriptors over a range of frames. The operations are propagation and interpolation. The controls for these operations are located in the range operations panel (ROP). Propagation copies the values of attributes to other frames. Interpolation estimates intermediate values of spatial attributes over a range defined by the RSB.
The below figures provide an example of range operations. They demonstrate the initial state of metadata in 5 frames of a video and the state after propagation and interpolation. The red rectangle in the figures 2 through 4 is the graphical representation of an obox attribute of a single instance of an object. Figure 5 shows the state of the RSB during the operations.
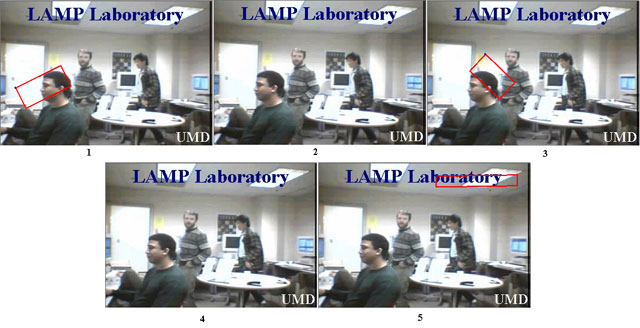
Figure 1: Range operations example. The initial state of GT data over 5 frames of a video.
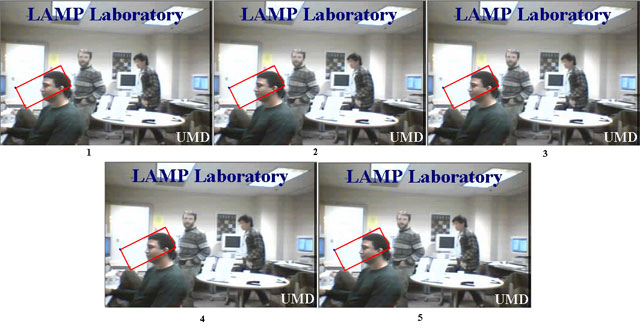
Figure 2: Range operations example. The state of GT data after propagating over range of frames 1 to 5, with the current frame 1.
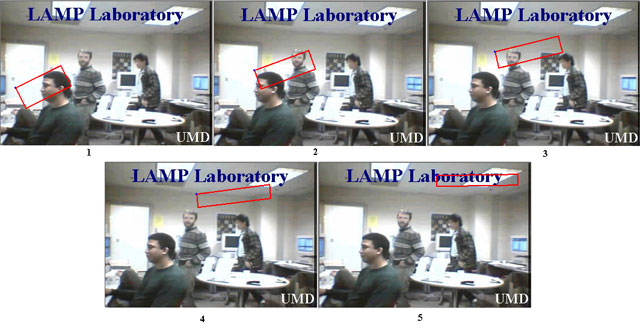
Figure 3: Range operations example. The state of the metadata after interpolating frames 1 to 5.

Figure 4: Range operations example. The state of the RSB during the range operations.
Propagation In Detail
Propagation copies the current frame's value of selected object descriptors to all frames in the range of propagation. All values of the chosen object descriptors are overridden with the values in the current frame.
To propagate the value of a descriptor, go to the frame that contains the value you with to copy. Check the checkboxes in the P column for the descriptor or descriptors you wish to propagate. You may propagate the value to other frames with the ROP: move the RSB to contain the range you wish, and then click Propagate Range. The second option is simply to change frames. All frames between the current frame and the frame you change to will take the current value of all descriptors marked for propagation.
Be careful! Once you have checked the box, it remains checked until you uncheck it or quit the program; changing the tab is not enough, as you may wish to propagate or interpolate two different types of descriptors at once. This is important, as one of the easiest, and most dangerous, ways to propagate a value is simply to leave propagate checked and go through a file a frame at a time; if you decide to go a hundred frames back, but forget to save and uncheck propagate first, you can easily erase a hundred frames of work.
Interpolation In Detail
Interpolation fills in intermediate values of spatial attributes given end values as shown in the above figures. All values of all spatial attributes of all chosen object descriptors for all frames in the open range defined by RSB are overridden with the values generated by interpolation algorithm. The values of string-based attributes are propagated with the value of the RSB start frame. To interpolate objects follow these steps:
- Define the range of interpolation using RSB.
- Enter values of all spatial attributes of all objects to be interpolated for min frame and max frame.
- Select objects to be interpolated the same way as you would for propagation.
- Click on the Interpolate Range button.
- Uncheck the P-column of all interpolated objects. This step is important, because objects marked for propagation will be propagated when you go to another frame, possibly overriding needed data.
Peruse Option
The state of Peruse On/Off button allows user to change current frame without propagating objects he or she has selected to be propagated. When Peruse button is in On state propagation will not occur when frames are changed, even if the propagate column is checked for an object valid in current frame. When the Peruse button is in Off state, propagation will occur normally.
User Interface Specifics
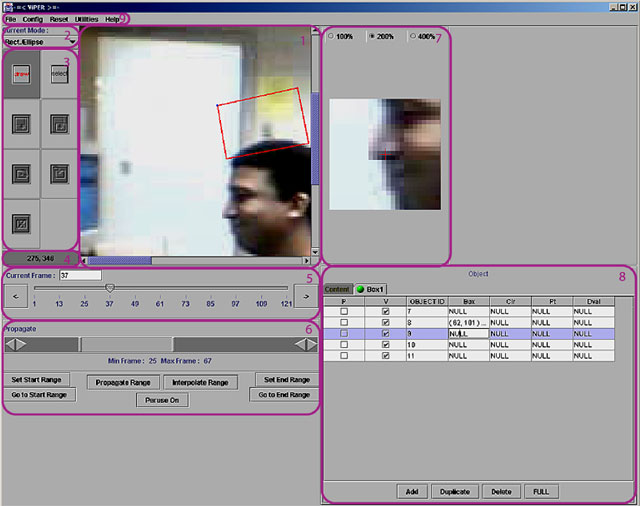
Figure 6: Viper GUI: (1) Canvas, (2) Shape Mode Selector, (3) Action Mode Selector, (4) Cursor Coordinates Panel, (5) Frame Control, (6) Range Operations Panel, (7) Zoom Panel, (8) Data Panel and (9) Menu Bar.
Canvas
The canvas displays the image corresponding to the current frame of the video. The panel is also used to draw, select and edit shape attributes via mouse motions and clicks.
Shape Mode Selector
This pull-down menu enables user to choose which kind of shape ViPER-GT will attempt to select when the mouse is clicked on the canvas. Changing the value of the shape mode selector unselects any shapes that were selected and puts ViPER-GT into select-action mode. The shape mode selector will change its value to match the type of shape attribute selected form the data table.
Action Mode Selector
Action mode selector consists of seven buttons, each representing an action mode. ViPER-GT can be in at most one action mode at a time. Thus, no more than one button can be in pressed state at a time. Not all actions represented by buttons are defined at all times; for example, bounding boxes do not support rotation, so the rotate buttons are disabled. When an action is disabled, the button representing it is grayed out. Each button's availability depends on current action mode and the type of shape selected.
The buttons in left to right, top to bottom order represent the following actions: draw, select, edit (resize), move, rotate around center, rotate around a corner and delete.
Cursor Coordinates Panel
Cursor coordinates panel displays the Cartesian coordinates of the mouse cursor within the canvas. The origin of the plane is in the top-left corner and the positive directions are right and bottom.
Frame Control Panel
The frame control provides the interface for determining which frame of the video is currently displayed in the canvas. When a given frame is chosen using the frame control, the frame's image is loaded into the canvas and the now-current shape attributes are drawn in the canvas.
The frame control gives three different methods of choosing a frame: dragging the slider tab to the desired frame, typing the number of the frame in the Current Frame text field labeled and pressing Enter, and using the arrow buttons on either side of the slider.
Range Operations Panel (ROP)
The range operations panel allows user to define a range of frames in video and conduct operations on object descriptors in the defined range of frames. Using the range operations panel, the user can propagate or interpolate descriptors over the range.
At the top of the ROP is the range selector bar (RSB). The RSB allows the user to visually chose the frame range. The gutter the slider moves in represents the entire video, while the slider itself represents the start (min) and end (max) frames of the defined range. The user may modify the size of the slider, thereby changing the min and max frame of the range, by dragging the vertical bars at the either end of the slider. The values of the start and end frames can be incremented or decremented using the arrow buttons on either side of RSB; the arrows modify the value of the near end of the range slider.
The Min Frame and Max Frame labels below the range selector bar display the exact values of the minimum and maximum frames of the range. Note that the values displayed change when the RSB is manipulated.
Below the RSB is a set of buttons that trigger range operations, traverse the range and provide another way of defining it: The Set Start Range button makes the current frame the min frame of the range, while the Set End Range button makes the current frame the max frame of the range. The Go to Start Range button makes the current frame equal to the RSB's min frame, while the Go to End Range button moves to the RSB's max frame.
The Peruse On/Off toggle button allows the user to navigate through the video without propagating descriptors with a marked propagate checkbox. When the button reads Peruse On, propagation will not occur while changing frames. When the button reads Peruse Off, the default, all selected descriptors will be copied to all frames the user traverses, and all frames in between.
The Propagate Range button copies the values of all descriptors selected for propagation to all frames defined by the RSB. The checkbox in the P-column is the marker for propagation.
The Interpolate Range button fills in the intermediate values for shape attributes of selected objects into the range defined by RSB. For example, if a bbox attribute of an object is located at top left of the frame in the min frame of the range and at bottom right in the max frame of the range, selecting that objects P-column checkbox and clicking the Interpolate Range button will make the bbox move linearly across the video. The Interpolate Range button propagates all string-based attributes.
See the appropriate sections for more details on interpolation and propagation of values.
Zoom Panel
The Zoom Panel allows user to see a close-up of the video's pixels around the mouse cursor. This can greatly increase the placement accuracy for shape attributes. The red cross in the middle of the zoom widow represents the location of the mouse cursor. Three levels of magnification can be chosen for the zoom panel. Note that zoom panel's magnification is multiplied by canvas's magnification, which can be selected through the Utilities >> Zoom menu item.
Data Panel
The Data Panel contains a spreadsheet representation of the metadata. It consists of one tab containing all of content descriptors and an arbitrary number object descriptor tabs, corresponding to each object descriptor type in the GTF configuration.
Each object descriptor tab has a round button that can be either in red or green states: the visibility ball. When the visibility ball is green, all of the shape attributes of the object descriptor are drawn in the canvas, but when the button is red, the attributes are not drawn.
Each object descriptor tab has a table that contains the information for all objects of this kind. Each row of the table represents an instance of the type whose name is in the tab, while each column (after the first three) represents an attribute. The left-most column labeled P is the propagate column, and contains a check box for each descriptor instance. The second column from the left, labeled V, shows if the object is valid for current frame; only objects valid for current frame can be edited. Checking the V-column for an object whose attributes already have values for other frames sets all the values to null for current frame. Note that if a descriptor is set as invalid for all frames it will not be saved. The last non-attribute column in the object tabs is the OBJECT ID column. The object identification number is unique to each instance of a given object descriptor type. It is not necessarily sequential and not all numbers may be present.
Each object descriptor tab has Add, Duplicate and Delete buttons and a FULL/CURRENT toggle button. The Add creates a new object valid for current frame, with all attributes initialized to null. The Duplicate button creates a copy of the selected descriptor with a different object ID. The Delete button removes the selected row from the table. The FULL/CURRENT toggle button toggles the view mode: in full mode all of the descriptor instances of the type are displayed in the tab; in current mode only valid descriptors are displayed.
The user can edit the attribute values by clicking the cells in the spreadsheet view and typing new values. Spatial attributes can also be drawn on the canvas, after being selected in the table. Refer to the appropriate above sections for more information.
Menu Bar
File
- Load Sequence or MPEG
- opens a dialog window that allows user to select video data to load. The data can be either an MPEG-1 video or a sequence of images defined in a .info file.
- Load Ground Truth
- opens a dialog window that allows user to select a metadata (GTF) file.
- Edit File Descriptors
- opens a window that displays the file descriptors in similar format to the data panel. The window displays the values of the file descriptors as they were when the file was loaded and does not reflect any changes made to the values of the file descriptors during the session. Nor does it allow user to edit the values of the attributes of file descriptors. Edits made using this window currently are not saved.
- Save
- save the currently loaded GTF.
- Save As
- opens a dialog window that allows user to select the directory and the name of the file to which the metadata is to be saved.
- Save As XML
- saves the current GTF in XML format. This menu option creates a file named <file_name>.gtf.xml, where <file_name> is the name of the GTF currently loaded into Viper. The XML file is created in the same directory as the currently loaded GTF.
- Close
- exits Viper, inquiring if GTF should be saved first.
Config
- Config Display
- opens the configure dialog window, which allows user to edit ViPER-GT's configuration settings.
Utilities
- View Data
- opens a window that displays the GT data in the same format as used in GTFs.
- View Configuration
- opens a window that allows user to see the configuration part of the GTF.
- View Big Screen
- opens a large window that contains a larger version of the canvas, shape mode selector and action mode selector. This option is especially useful when authoring ground truth for large images and/or using a high magnification.
- Dump Image(s)
- allows user to create the images of selected frames with shapes drawn in ViPER-GT overlaid.
- Change Color
- allows user to select the color scheme of the shapes drawn in the canvas.
- Create Movie
- does not work.
- Create Complete Movie
- does not work.
Help
No online help is available at this time.
Editing Metadata Configuration
GTF Format Overview
A ground truth file (GTF) is a text file that contains media metadata that can be created and modified using ViPER-GT. Each ground truth file consists of two sections: configuration and data.
As described in the first sections of this manual, the ground truth data is stored as a set of records. Each record, called a descriptor, annotates an associated range of frames with a set of attributes. To inform applications of the types of descriptors that were used to create the data file and the data-types of the associated attributes, users must provide configuration information at the beginning of each ground truth file. While the ViPER-Samples include a few basic descriptors, it will often be necessary to define additional descriptors. For some insight as to the difficulty to the process, see the ViPER Case Studies document, or some of the MPEG-7 archives.
Descriptor Types
At the highest level, both the configuration and data representations are classified using one of three main descriptor types. These include:
- FILE Type
- This type of description is used for video level information such as the video format, source, number of frames, frame rate, and frame size. FILE descriptors apply to the entire video and not to a particular set of frames. A typical descriptor may relate source information such as the original date and time of digitization or the format of the video. ViPER tools rely on the existence of an INFORMATION descriptor, described in the
Scripting Vipermanual. - CONTENT Type
- This type of descriptor is used for static content information which occurs over a range of frames, and whose description remains constant over that range. For example, one may wish to describe the type of environment where the shot was taken (INDOOR v. OUTDOOR), or the existence of a fade or dissolve over a particular range. There can be only one instance of a given CONTENT descriptor for any given frame. If any of the attributes of the CONTENT descriptor change, it will be assumed to be a new instance of that descriptor.
- OBJECT Type
- This type of descriptor is used for objects or events which exist over a range of frames, and may either have multiple instances in existence simultaneously (such as faces) and/or have attributes which can vary over the range (such as position). By default, an object type will have dynamic attributes, meaning the value of the attributes can change over the existence of the object, without generating a new instance of the object.
Configuration Section
The configuration section explicitly outlines all possible descriptors in a viper file. It defines each descriptor type by name and lists all attributes for each descriptor. Note that descriptors must have unique names in their category (FILE, CONTENT, or OBJECT), and that each attribute must be uniquely named in its descriptor. Each attribute must have a data type, and some, such as lvalue,
must take additional information. Each attribute may have a default value, which will be used if it is not listed in the data file or when creating a new instance of the descriptor in ViPER-GT.
In the XML file, this section is located one level deep from the root <viper> element, contained in a <config> element. Each descriptor is defined with a <descriptor> tag, which has two required xml-attributes, name
and type.
Beneath the <descriptor> tags are lists of <attribute> tags. The <attribute> tag has two required attributes, name
and type
, and one optional attribute, dynamic,
which is defined as false for FILE and CONTENT descriptors, but may be set to true for OBJECT descriptors. Finally, each attribute may have a <default> child element, which will contain a single instance of the attribute type data, and some attributes may have type-specific extended config elements as children.
The older, GTF format, while too simple for most tools, is still useful for editing viper config sections. The section is delimited by the #BEGIN_CONFIG and #END_CONFIG tokens, each on a line by itself, placed before data section. The descriptor types are used as delimiters, so it is impossible to have an attribute named OBJECT, CONTENT or FILE. Extended information is placed in brackets after the data type; default information is placed at the end of each attribute line in brackets with the word default, eg [default 12]; static attributes of OBJECT descriptors have the keyword [static] append onto the end.
| XML Format | Old .gtf File Format |
|---|---|
<config>
  <descriptor name="Information" type="FILE">
    <attribute name="SOURCEDIR"
                  type="svalue"/>
    <attribute name="SOURCEFILES"
                  type="svalue"/>
    <attribute name="H-FRAME-SIZE"
                  type="dvalue"/>
    <attribute name="V-FRAME-SIZE"
                  type="dvalue"/>
  </descriptor>
</config>
|
#BEGIN_CONFIG FILE Information SOURCEDIR: svalue SOURCEFILES: svalue H-FRAME-SIZE: dvalue V-FRAME-SIZE: dvalue #END_CONFIG |
As mentioned previously, there are only three types of descriptors: FILE, CONTENT and OBJECT. The descriptor names and attributes are user specified (although we do provide a basic set of descriptors and attributes we use to ground truth our data). Viper currently recognizes a set of eleven core attribute data types, described in the appendix. Users are welcome to create new data-types, and by default, all Viper software will ignore unknown attribute data types.
Descriptor Configuration Quality
If you say what you mean rather than what you want done with it, you can repurpose it so much better - TimBL
A good viper configuration allows for an expressive vocabulary designed for use. ViPER-GT was designed to create ground truth; as such, the main goal with creating much ground truth is for use in evaluation. As such, there is often a one-to-one mapping from a descriptor type in a viper file to some problem to evaluate.
For example, we have descriptors for people, faces and text. While it would be possible to combine people
and faces
into one descriptor, the separation keeps the descriptors simple. If necessary, a relation
attribute may be added to link the two. For other situations, such as metadata markup for use in a video browser, the requirements are quite different.
However, note that the data is designed for the problem, not for any particular solution. For example, if you have an algorithm that finds text in certain conditions, such as in a very specific typeface, it is recommended that you have a single descriptor for text that has a typeface
attribute, instead of defining a single descriptor for the problem. Later, if you want to compare your algorithm to others, you may use the typeface
attribute to distinguish them. By designing the data for the problem, you make the investment of time and resources into developing the data more easily leveraged when you generalize your algorithm, and you allow your algorithm to be evaluated as a solution to a problem, instead of as a benchmark against only itself.
Viper File Format Examples
Configurations Section
FILE descriptor example
A FILE descriptor, with descriptor-name Information, may have a configuration record that looks like this:
FILE Information
    SOURCE : svalue [default CNN]
    COMMENT: svalue
    NCLIPS : dvalue [default 14]
    FORMAT : lvalue [MPEG MJPEG AVI MOV]
    FRAME-HEIGHT : dvalue [default 320]
    FRAME-WIDTH : dvalue [default 480]
This descriptor will allow the specification of the source of the video, the number of clips, the format and the frame size. Note that in xml, the descriptor definition is far more verbose:
<descriptor name="Information" type="FILE">
  <attribute name="SOURCE" type="svalue">
    <default>
      <data:svalue value="CNN"/>
    </default>
  </attribute>
  <attribute name="COMMENT" type="svalue"/>
  <attribute name="NCLIPS" type="dvalue">
    <default>
      <data:dvalue value="14"/>
    </default>
  </attribute>
  <attribute name="FORMAT" type="lvalue">
    <data:lvalue-possibles>
      <data:lvalue-enum value="MPEG"/>
      <data:lvalue-enum value="MJPEG"/>
      <data:lvalue-enum value="AVI"/>
      <data:lvalue-enum value="MOV"/>
    </data:lvalue-possibles >
  </attribute>
  <attribute name="FRAME-HEIGHT" type="dvalue">
    <default>
      <data:dvalue value="320"/>
    </default>
  </attribute>
  <attribute name="FRAME-WIDTH" type="dvalue">
    <default>
      <data:dvalue value="480"/>
    </default>
  </attribute>
</descriptor>
CONTENT descriptor example
As another example, suppose we have a CONTENT descriptor, with descriptor-name Shot-Change, which has a single attribute TYPE and a list of possible values. Â Its configuration record may look like:
CONTENT Shot-Change
     TYPE : lvalue [CUT FADE-IN FADE-OUT DISSOLVE]
This will allow us to describe, by type, a shot change that occurs over a specified range. Note that there can be only one Shot-Change at a time, making it a good candidate for a CONTENT descriptor.
Again, the xml version is considerably longer:
<descriptor name="Shot-Change" type="CONTENT">
  <attribute name="TYPE" type="lvalue">
    <data:lvalue-possibles>
      <data:lvalue-enum value="CUT"/>
      <data:lvalue-enum value="FADE-IN"/>
      <data:lvalue-enum value="FADE-OUT"/>
      <data:lvalue-enum value="DISSOLVE"/>
    </ data:lvalue-possibles >
  </attribute>
</descriptor>
OBJECT descriptor example
Recall that OBJECT descriptors are used to represent events where either more than one occurrence of an object can be found, or where an object has attributes which can change over the range of frames where it exists. Â
If we have a person, for example, one may wish to track that person through the scene. We may define an OBJECT descriptor with descriptor-name Person as follows:
OBJECT Person
     NAME: svalue [static]
     GENDER : lvalue [MALE FEMALE] [default MALE] [static]
     AGE : dvalue [default 0] [static]
     HASHAIR : bvalue [default TRUE] [static]
     INCONVERSATION: relation [PERSON] [static]
     PERCENTVISABLE : fvalue
     NOSE : point
     HEAD : bbox
Expressed in the xml format:
<descriptor name="Person" type="OBJECT">
  <attribute name="NAME" type="svalue" dynamic="false"/>
  <attribute name="GENDER" type="lvalue" dynamic="false">
    <data:lvalue-possibles>
      <data:lvalue-enum value="MALE"/>
      <data:lvalue-enum value="FEMALE"/>
    </ data:lvalue-possibles >
    <default>
      <data:lvalue value="MALE"/>
    </default>
  </attribute>
  <attribute name="AGE" type="dvalue" dynamic="false">
    <default>
      <data:dvalue value="0"/>
    </default>
  </attribute>
  <attribute name="HASHAIR" type="bvalue" dynamic="false">
    <default>
      <data:bvalue value="true"/>
    </default>
  </attribute>
  <attribute name="INCONVERSATION" type="relation" dynamic="false">
    <data:relation-target value="PERSON"/>
  </attribute>
  <attribute name="PERCENTVISIBLE" type="fvalue"/>
  <attribute name="NOSE" type="point"/>
  <attribute name="HEAD" type="bbox"/>
</descriptor>
Data Section
For examples of the data section, see the Scripting Viper manual.
Appendix
Terminology
- Candidate data
- Also known as result data, this is the set of descriptors generated by some algorithm that will be compared to the target data
- Detection
- An object is classified as
Detected
if one of its type is found on the frame. For example, if you want to retrieve all frames containing faces, you may find thatDetection
is the only required depth of analysis. - GTF
- Ground truth file. This is a file containing ViPER metadata, and need not refer to truth but sometimes refers to software generated or otherwise untrustworthy metadata.
- RDF
- Result data file. This is ViPER metadata that was algorithmically generated.
- Results data
- See Candidate data
- ROP
- Ranged Operations Panel. Located beneath the main canvas, this panel includes user interface controls for propagation and interpolation.
- RSB
- Range Selector Bar. Graphical element used for selecting the range of interpolation or propagation.
- Target data
- Also known as truth data, this is the set of descriptors that represent the true content of the media file
- Truth data
- See Target data.
- Visibility ball
- The green or red ball in each tab of the data panel. Set to green indicates that the shapes are visible in the canvas, while red means that the shapes are to be invisible and unable to be selected.
Attribute Data Types
- bbox
- A bounding box; it is a rectangle on the image.
- bvalue
- A Boolean value: either
trueorfalse. - circle
- A circle, in terms of center point and radius.
- ellipse
- An ellipse, in terms of its bounding box.
- fvalue
- A floating point number.
- lvalue
- An enumeration type. Its configuration must take a list of possible values. In the gtf format, this is done with a bracketed list, eg [LEFT RIGHT]. In the xml format, the <attribute> element must have a <data:lvalue-possibles> child, which in turn has a <data:lvalue-enum> element for each value, where the value is specified in the
value
xml-attribute of the element. - obox
- An oriented bounding box.
- point
- Some specific pixel in the image.
- polygon
- A polygon or polyline, given as a list of points.
- relation
- A set of object identification numbers to a certain type of descriptor.
- svalue
- A string value. Remember that strings must be xml-escaped in the XML format and C-escaped in the GTF format.
GUI Properties File
The viper-gt command line tool takes an optional third argument, a .properties file. There is a sample file included in the viper/gt/CONFIG directory. This includes a list of images for the various toolbars, default directories (these are used from the command line when you type a file name without a directory separator (/ or \)), key configurations, default colors, and utilities for saving and playing files.
| Property Name | Description | Default Value |
|---|---|---|
| dataDir | Where to look for media files by default. Used for loading media files from the command line without path separators and for the default starting place in the Load Sequence or MPEG dialog. To load from the current directory, add ./ to the front of the file name. |
DATA |
| configDir | Where to look for metadata files by default. Used for loading .gtf files that do not have path separators on the command line and as the starting place for the Load Ground Truth file dialog. To load a ground truth file from the current directory, add ./ to the front of the file name. |
GTF |
| dumpDir | Where to print out overlays. | DUMP |
| dumpExtension | File extension to give output images. | .ppm |
| rectSelectedColor | Color of selected rectangle. | Yellow |
| rectColor | Color of Rectangles | Red |
| MoveForwardFrame | Advance one frame of the video. | CONTROL-F |
| MoveBackFrame | Go back one frame of the video. | CONTROL-B |
| Select | Switch to "Select" mode. | CONTROL-S |
| Draw | Switch to "Draw" mode. | CONTROL-R |
| Edit | Switch to "Edit" mode. | CONTROL-E |
| Move | Switch to "Move" mode. | CONTROL-M |
| RotateCenter | Switch to "rotate about center of object" mode. | CONTROL-C |
| RotateOrigin | Switch to "rotate about object origin" mode. | CONTROL-O |
| Delete | Delete the selected item. | CONTROL-D |
| ZoomIn | Zoom in on the canvas. | CONTROL-Period |
| ZoomOut | Zoom out, if not already at 100% zoom. | CONTROL-Comma |
| SkipForwardFrame | Advance several frames, without propagating. | CONTROL-SHIFT-F |
| SkipBackwardFrame | Go back several frames, without propagating. | CONTROL-SHIFT-B |
| SkipFrameAmount | Number of frames to skip when using the skip frame shortcuts. | 10 |
| MoveUp | Nudge the selected object up one pixel | CONTROL-Up |
| MoveRight | Nudge the selected object right. | CONTROL-Right |
| MoveDown | Nudge the selected object down. | CONTROL-Down |
| MoveLeft | Nudge the selected object to the left. | CONTROL-Left |
| MoveUpRight | Nudge the selected object diagonally up and to the right | CONTROL-PgUp |
| MoveDownRight | Nudge the selected object down and to the right. | CONTROL-PgDn |
| MoveDownLeft | Nudge the selected object diagonally down and to the left. | CONTROL-End |
| MoveUpLeft | Nudge the selected object diagonally up and to the left. | CONTROL-Home |
| ToggleSlidesDraw | Toggle drawing of box edges. When turned off, just the corners are visible. | CONTROL-T |
FAQ/Trouble Shooting
The zoom window appears distorted/does not appear.
ViPER-GT requires several additional packages from Sun in addition to the base Java installation. They should be included with the distribution, but they may not be appropriate for your version of the Java VM. To get the latest version of Java Advanced Imaging, go to http://java.sun.com/products/java-media/jai/.